Appearance
The World Map
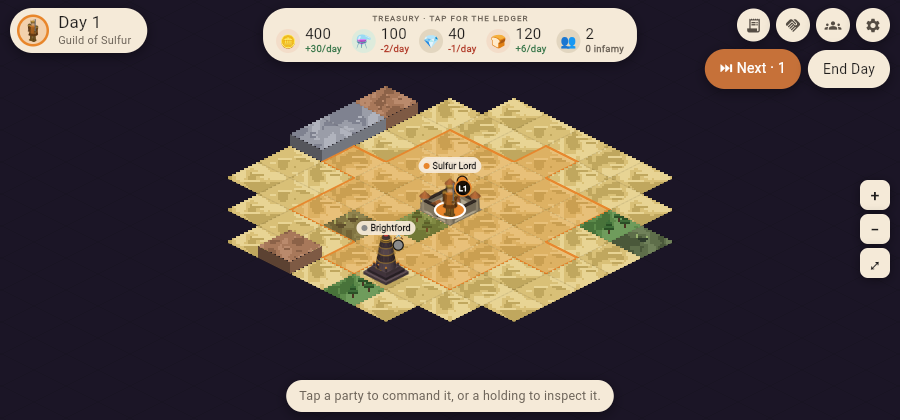
The map wraps in all directions. It is a globe. The day and your guild sit top-left, the treasury across the top, and the chronicle, the rolls, the menu and the turn's two buttons top-right. Tap a tile and a roll unfurls down the left edge with a seal for everything standing on it.
The world is a globe: march far enough east, west, north or south and you come around the other side. The top bar shows the day, your treasury with its net daily change, and the End Day button. Press it and every unit refreshes its movement, income pays out, and everyone else takes their turn.
Nothing on the map interrupts you to deliver news. The chronicle button in the top bar keeps a count of everything that has happened since you last opened it. Read it when you want to, and the count clears. With nothing selected the map is simply the map. Tap any tile and the muster roll hangs beside it: a seal per party standing there, and one for the holding under them.
Moving
Tap your party's tile, then its seal on the roll, then a destination. The route appears with numbered day flags showing where each travel day ends, and a march card opens beside the target with the whole cost of the road:
- how long it takes: "Arrives today", or the number of days;
- why: what the road costs in movement points, and what the ground at the far end charges for each step onto it. A short hop through swamp at ×3 a step can cost more than a long march over plains;
- what waits there: the garrison holding it and what it musters, or a note that the holding is undefended and walking in takes it;
- whose ground it is: marching onto land another guild has claimed is a trespass, and they will treat it as one. The borders on the map are drawn in the owner's colour.
Then March, or ✕ to think again. (Tapping the destination a second time marches as well.)
If the road would walk you into another guild's holding, you are asked first, even an undefended one. Taking a neighbour's mine is a decision, not a side-effect of picking a tile. Marauder holds are nobody's: clearing one is ordinary work and passes without a question. Travel orders persist. Your party keeps walking each day until it arrives, meets an enemy, or you press Halt.
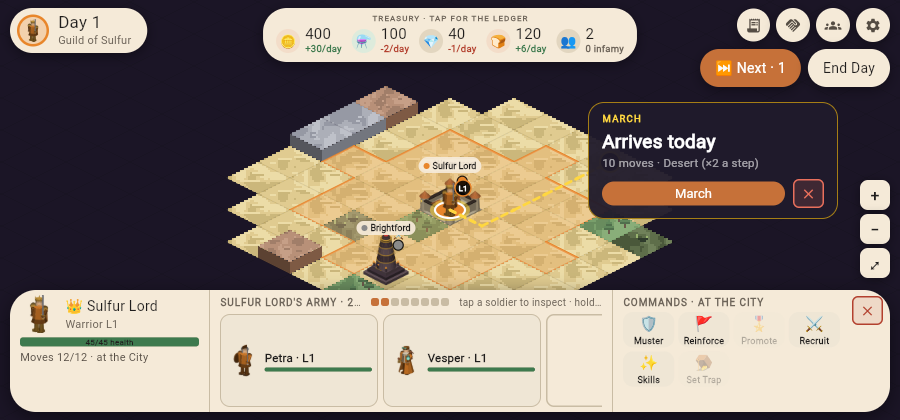
How long the road takes, what it costs in movement, what waits at the far end, and whose land you are crossing. Read it before marching: it prices the whole trip before you take a step.
Zooming: pinch on a touch screen, or use the ⟳ / + / − / ⤢ pad in the bottom-right corner (⤢ snaps back to your party). The battlefield zooms the same way.
Turning the world: ⟳, the first button on that pad, walks the camera a quarter of the way round. City walls, crags and tall holdings stand in front of ground you may need to reach, and a fixed angle can never see past them. So the world turns instead. Whatever tile was in the middle of your screen stays there, so a turn never loses your army. The battlefield has the same control.
The top bar walks you through the day. While any party still has movement and no orders, ⏭ Next leads: tap it to jump to the next party awaiting orders (tap it again to wave the selected party past for the day). Parties on standing travel orders, or holding for marchers, never ask. Once every party is settled, End Day takes the lead, and each new morning jumps you straight to the first party awaiting orders.
The banner
On the Android version a small advertisement rises along the foot of the map. It is a band, not an overlay: the board is drawn in the space above it, so it never covers a tile, a button or a battle. It never appears on the battlefield at all.
Tap the ✕ beside it and it goes away for five days. Advance past the fifth and it comes back. If you would rather it never came back, the Settings menu sells a one-off Remove ads for a small sum.
The browser version has no such banner. Its ads sit in bands above and below the page, outside the game entirely.
Camping a column
A hero parked at a hall while their retinue drills has nothing to decide for a week, and being asked every morning gets old fast. Two standing orders on the selected party's callout take a column out of the morning muster: it stops being counted by ⏭ Next and stops holding up the end of the day, while staying fully commandable. Nothing is locked. It is simply no longer asked.
⛺ Camp halts the column to mend and lets go by itself the moment everyone in it is whole — full health and full Essence — with a line in the chronicle saying they have broken camp. That is the order for a column that has been mauled: park it and be told when it can fight again, rather than checking on it every morning or forgetting it for a month.
🛡 Defend holds the ground until you say otherwise and never releases itself. That is the order for a column guarding a pass, a ford or a hall — somewhere you meant to leave it.
Both survive the night and a save. Tap the lit order again to bring the column back into the muster, and giving it anywhere to march lifts either by itself.
Fog of war
You see what your parties and holdings can see. Explored land stays on the map, dimmed, but enemies show only when actually in sight. (The eye button toggles fog for a debug look at the whole world.)
Territory
Buildings claim the tiles around them, tinted in their owner's color. Owned tiles pay the building's income, scaled by how much of its claimed land you actually hold. Friendly ground heals your units every night.
A settled claim spreads: hold a building a few days and its territory creeps a tile outward, up to three tiles past its base reach. Capture resets the creep, so a new banner spreads from scratch. Borders hold firm: the creep only takes open land, never ground inside another guild's own claim. A border moves when you take the building behind it, not by waiting. Spreading claims also ward the blight further (see below).
Buildings
Tap any building you've explored (with no party selected) and the Holdings hub opens on it: its name, level, how many floors it rises or delves, what it yields and trains, who holds it, and its story. If it is yours, the rail beside it carries every section it has (jobs, works, walls, drill yard), and ◂ ▸ pages on to the next holding you own. If it is not yours, the hub says so and offers to fly you there.
The blighted heart
The center of the world belongs to Entropy: a vast wasteland thick with its fortified holdings, growing crueler the deeper you press, and richer. Garrisons stand harder near the heart, but so does the treasure: the finest relics in the world are found only in the deep blight. The outer wilds are gentler, broken up by oceans. Water can be crossed, but at a crawl, so plan your marches around the coasts.
A hall of yours with nobody in it to drill wears a cream badge with an arrow on the shoulder opposite its banner dot. Training is not automatic — somebody of the right calling has to be standing there — so the badge is how you find a barracks quietly doing nothing without opening every holding in turn. A hall full of the wrong calling counts as idle too, because it can drill none of them.
The blight expands outward gradually: faster on Hard difficulty, slower on Easy. Any unclaimed buildings it reaches fall under Entropy's control. Your controlled territory blocks the blight, so capturing buildings protects the surrounding lands. Entropy's armies can't march beyond the blight's edge. Tip: don't leave the outer lands undefended. If the blight reaches them, you lose territory and income. The blight can seem quiet, but when Entropy's garrisons are weakened, new armies emerge from its heart. You can reclaim land the blight took by capturing those buildings and the treasure they still hold.
The seven guilds all ring the blight. Everyone is fighting toward the same center; the question is who gets there strongest.